Banana, Peanut Butter and Maple Porridge

Standard

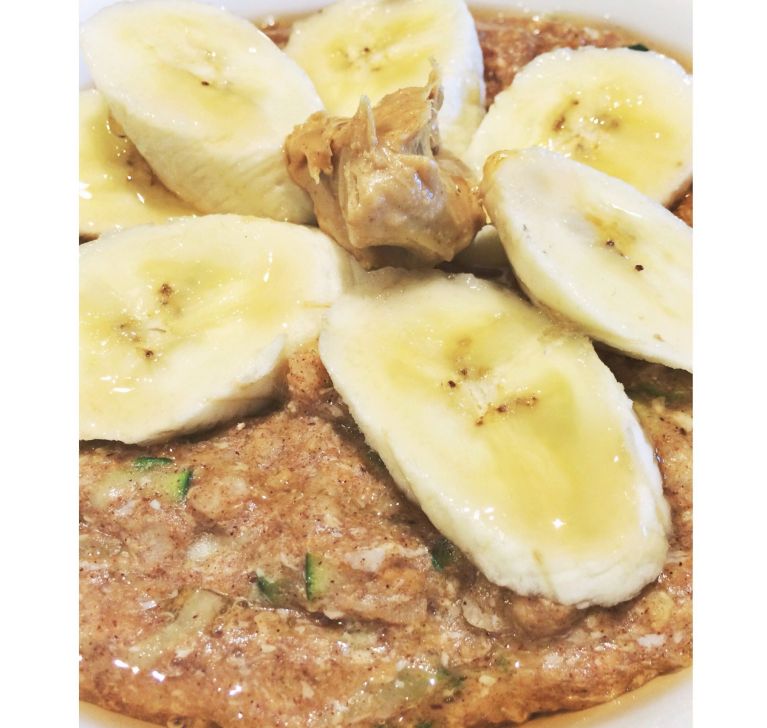
This porridge is a delicious, nutritious and filling way to start the day! The surprise mouthfuls of peanut butter that you get are absolutely divine! I prefer this porridge cold the next morning, but it can also be enjoyed warm.

It’s an ideal pre or post workout breakfast as it contains a combination of protein, carbs and good fats. It’s quite calorie dense and filling, so I love to have this breakfast after a morning training session or as a weekend treat. 🙂

Recipe serves one (or more, depends how much food you can eat in one sitting 😉 )

Ingredients

48g Brookfarms ‘Gluten Free Porrij’ (you can also use oats, but the nuts in the porridge really complement the peanut butter flavour perfectly!)

½ cup grated zucchini (optional – for added goodness!)

2 egg whites

12g PB2 Powdered Peanut Butter

½ – 1 tbsp natural peanut butter (or for a sweet treat, try White Chocolate Wonderful Peanut Butter by Peanut Butter & Co)

50-100g banana slices

10ml Sugarfree Maple Syrup

1 tbsp cinnamon

Stevia to taste

Method

  1. Add zucchini and porridge/oats to a saucepan with 1 cup of water, 1 tbsp of cinnamon and stevia to your liking.
  2. Cover and bring to the boil.
  3. Once boiling, turn down to a gentle simmer and remove lid. Allow to simmer until most of the excess water has evaporated
  4. Add the egg whites and stir quickly for about 20 seconds until eggs are cooked through.
  5. Remove from heat and stir through the PB2.
  6. Transfer to a bowl and stir through the peanut butter into the hot porridge.
  7. Leave in the fridge overnight. In the morning, top with banana and sugarfree maple syrup.

Note: For a lower calorie option, combine some more PB2 with water to make a ‘sauce’ to drizzle over your porridge instead of mixing in the peanut butter.

Advertisement

“Fail to prepare, prepare to fail”

Standard

A few people have asked me how I organize myself to ‘meal prep’.

Meal prep is tough work – it takes a lot of organization and a lot of time. I’ve figured out a few ways to make the process more efficient, so I waste less time cooking and more time… well, eating!

Here is the step-by-step process I use to prep my meals for the week:

1. Write a weekly meal plan.

I plan out exactly what I’m going to eat for all six meals of the day, for seven days of the week. I do this by breaking it into protein, fats, greens and carbs, so I know I’m meeting my nutrient requirements for each meal.

Note: I eat the same six meals every day for a week. You don’t have to do it this way, but I find it easier to plan for when every day is the same.

2. Grocery shopping

I calculate how much of each type of meat I’ll need to get me through that whole week. For instance if I eat 150g raw meat 5 times a day, then:
150g x 5 = 750g per day. 750g x 7 days = 5.25kg.

Note: I do this separately for each type of meat, this is just an example of how I calculate it.

I then go and buy all the meats (I get a variety of chicken breast, turkey, and salmon depending on what meals I’ve planned). The butcher looks at me like I’m crazy, but that’s ok. He doesn’t ask questions.

I follow the same process with my fats and veggies. I usually buy veggies for half the week and do another veggie shop mid-week so they stay fresh.

3. Label your bags

I buy plenty of little snap lock bags which I label with the day and the meal number e.g. ‘Monday 2’.

4. Prepare the meat

I cut all the meat up into 150g portions, weighing it as I go and putting it into the corresponding snap lock bag. I then freeze all of the meat except what I need for the next two days.

5. Cook for two to three days at a time

I do a big cook up usually every second day. Some people cook for 3 days, but I’m just cautious of leaving food in the fridge for too long so prefer to cook for 2. It’s important to cook a few days in advance, or you will end up cooking all the time and won’t have the meals ready if you’re going to be out all day.

Note: The only meal I don’t prepare is meal 1, which I cook in the morning each day.

6. Invest in a good carry bag (e.g. six pack bag)

Having a refrigerated carry bag is important so you can take your meals with you and be prepared wherever you go. If you aren’t prepared, and you get hungry when you’re out, you are likely to make bad choices.

Here is an example of how I plan out my meals to determine how much of everything I need. This is one day. I times the quantities by seven and there you have it – everything I need for the week!

PROTEIN GREENS FATS CARBS
M1 3 Eggs 1tbsp Butter
M2 150g Chicken Zucchini, Carrot 1tbsp Coconut Oil
M3 150g Turkey Mixed Salad ¼ Avocado
M4 125g Salmon Spinach 1tbsp Coconut Oil 150g pumpkin
M5 150g Chicken Tomatoes, Capsicum, Kale 1tbsp Coconut Oil
M6 150g Chicken 1tbsp Coconut Oil

The most important things are to keep it simple, quick and easy for yourself. I buy herbs and spices, lemon and limes so I can chuck these on as I’m cooking to add flavour without much fussing around. The harder you make it, the less likely you will be able to maintain it.

Happy eating!

With love,
B.xx